Terraform Provider Aliases
The Challenge
I want to deploy a similar set of resources in multiple Azure Subscriptions from a single Terraform repository.
To achieve this, I’m going to make use of Provider Aliases in Terraform.
Provider Aliases
Per Terraform’s documentation:
Terraform Providers - Multiple Provider Configurations
In brief - think of Provider Aliases as something like Shortcuts in Windows (or indeed Aliases in Mac OS or Symbolic Links in Linux).
Just as Shortcuts/Aliases/Symlinks are representations of locations on your computer, Provider Aliases - certainly in this use case - are representations of “locations” (Tenant/Subscription) in your Azure Tenant. Stuff you pass to these Aliases (as with Shortcuts) will be sent to (or in the case of Terraform, applied to) the location the Alias represents.
The major difference in this case is that these Provider Aliases will also contain the relevant credentials to be able to modify the resources within the referenced location - so in this instance you might look at them more as a Mapped Network Drive in Windows Explorer.
The Default Provider - in the case of azurerm - expects certain details to be passed to it, such as the tenant_id
, subscription_id, and in order to authenticate to the given location, a client_id and client_secret. There
are a couple of ways to pass this information to Terraform, but in this case we’ll be using environment variables.
(We will create the requisite Service Principal for the client_id then the subsequent client_secret later.)
Provider Aliases allow you to specify alternative tenant_id, subscription_id, client_id and client_secret
values, making it easy to target these alternative locations (Tenant/Subscription) when deploying resources, by
using the provider argument in a given Terraform resource block.
Hopefully that’s enough context-setting for now.
Prerequisites
- A Microsoft Azure Tenant.
- 2 separate Subscriptions within the above Tenant.
- Terraform installed locally.
Assumptions
-
You already have an Azure Tenant with a basic Pay-As-You-Go Subscription.
If you do not yet have an Azure Tenant, please follow the below from Microsoft to get yourself set up:
-
You have a basic working knowledge of Hashicorp Terraform.
If you’ve not yet experienced Terraform, I highly recommend following their Tutorials to get a basic working knowledge of their Infrastructure as Code (IaC) tooling.
Setting up a second Pay-As-You-Go Subscription
Steps
- Log in to your existing Subscription.
- Navigate to the Subscriptions blade.
- Click + Add.
-
On the “Basics” page, enter a name for the new subscription and keep a copy in a notepad for use later - leave all other details as default, choosing “Microsoft Azure Plan” for the Plan type.
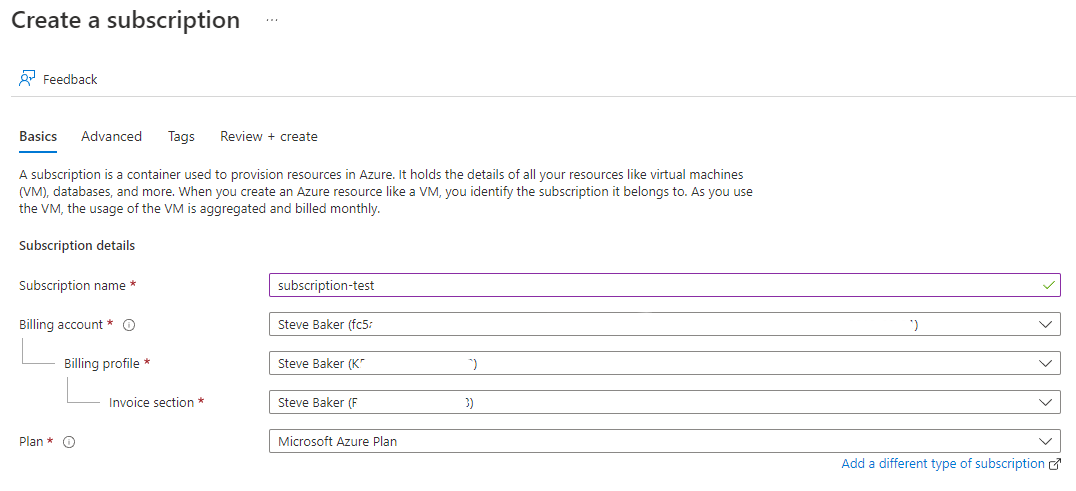
-
Click “Review + create” then “Create” - after a few seconds, refresh the page and the subscription should be visible.
NOTE: If the Subscription doesn’t show up, you might need to adjust your Global Filter to include it.
Adding App Registrations for Terraform
A Word About Service Principals/App Registrations
In order to allow Terraform to interact with and modify resources in your Subscriptions, you need to set up a Service Principal - also known as an “App Registration” - which is effectively a Service Account, more secure than a standard password-protected user account, as it is tightly scoped to the given level you wish to control, and uses specific “secrets” - long, complex passwords which can only be seen when created - that you name for the specific Application which will use them - for further information and a better explanation of Service Principals and their uses, see the Microsoft Documentation linked below.
In brief, think of the Service Principal/App Registration we create as a key (for a very specific lock) that we will give to Terraform to allow it to make changes to the relevant Subscription(s).
Whilst we could scope the requisite permissions to the Management Group level / give the Service Principal access to multiple Subscriptions - this isn’t really in the spirit of the Principle of Least Privilege. Plus this methodology can be extended into a multi-tenant/ multi-subscription deployment method, which is outside the scope of this post - though the process is basically the same.
Microsoft Learn: Service Principals
Terraform Registry: Creating a Service Principal in the Azure Portal
Steps
- Navigate to the Azure Active Directory blade in your Tenant.
- Click “App registrations” in the left-most column.
- Click “+ New registration”.
-
Give a meaningful name, relating to the intent and scope of this App reg. Since we’ll use this one on the Pay-As-You-Go Subscription and it’s used by Terraform, let’s call it
terraform-payg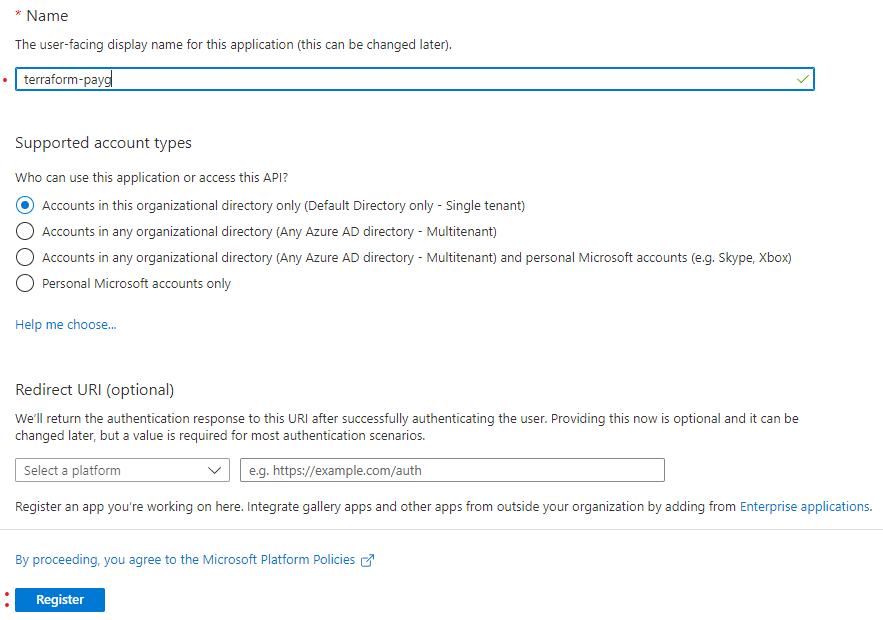
- Leave everything else as default, then click “Register”.
- On the next screen, copy the Application (client) ID and Directory (tenant) ID to a secure location - we will combine these with the Subscription ID and Client Secret value to give to Terraform later.
- Now, click “Certificates & secrets” in the left-most menu - this is where we will create the unique credential for Terraform to use.
-
Making sure you are on the “Client secrets” tab, click “+ New Client Secret”.
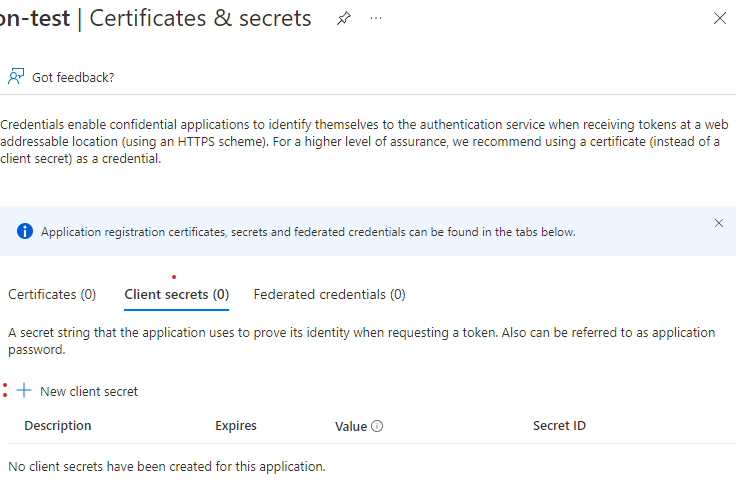
-
Describe the client secret accordingly and set a suitable expiry, then click “Add”.
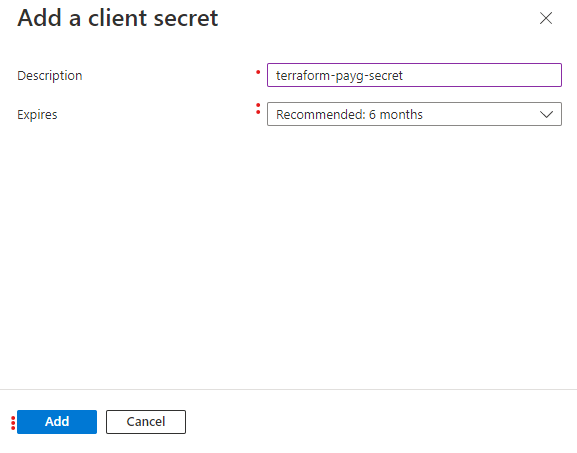
-
At this point, you have the opportunity - the only one you’ll get - to copy the Secret value. Do this NOW, and make sure you keep it somewhere safe and secure. Don’t copy the Client Secret ID - it’s not needed in this case.

- Repeat the above steps, changing the App Registration/Client Secret names accordingly to reflect the other subscription we’ll be targeting, then continue with the next section - Role assignment.
Role Assignment
In order for the Service Principals/App Registrations we just created to allow Terraform the required permissions to modify resources inside our Subscriptions, we need to grant them the appropriate Role in the Scope of those Subscriptions.
As above, I’ll list the steps for the Pay-As-You-Go Subscription, then these can be repeated for the subsequent Subscription(s).
Steps
- Navigate to the Subscriptions blade.
- Click the “Pay-as-you-go” entry (or whatever you called yours).
- Click “Access control (IAM)”.
-
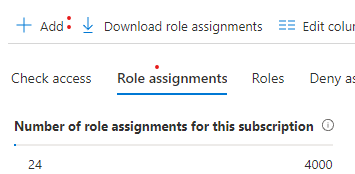
Click the “Role assignments” tab,click “+ Add”, then click “Add role assignment”.
- From the Role selection screen, click to choose “Contributor”, then click “Next”.
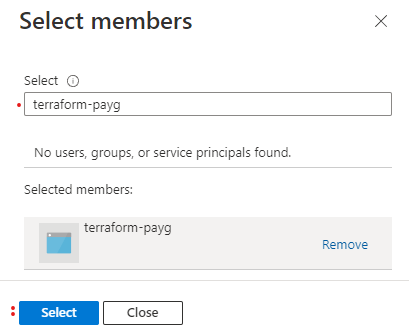
- With “Assign access to” set to “User, group, or service principal”, click “+ Select members”.
- Search for the Service Principal name we created earlier (you kept a note of all this, right?).
-
Click the appropriate entry, which will drop it into the “Selected members:” section, then click “Select”.
- Add a Description if desired, then click “Review + assign” at the bottom-left.
- On the summary screen, we can see the Subscription GUID we’re scoping the Role (permission level) to. Assuming you’re happy, click “Review + assign”.
- Repeat the above steps to give the other Service Principal(s)/App Registration(s) the Contributor Role for the other Subscription(s).
Defining Provider Aliases
Now we’ve created the requisite Service Principals, noted the Client Secret details and any supporting information, it’s time to set up the Provider Aliases with this information.
Terraform Variables File
We need to declare variables into which our custom Environment Variables will be ingested.
-
Create a file called
variables.tfand add the following code:variable "tenant_id" { description = "Unique ID of the Azure Tenant" } variable "payg_client_id" { description = "Unique ID of the Pay-as-you-Go Authorised Service Principal" } variable "payg_client_secret" { description = "Password of the Pay-as-you-Go Authorised Service Principal" } variable "payg_subscription_id" { description = "Unique ID of the Pay-as-you-Go Subscription" } variable "subscription_test_client_id" { description = "Unique ID of the Subscription_Test Authorised Service Principal" } variable "subscription_test_client_secret" { description = "Password of the Subscription_Test Authorised Service Principal" } variable "subscription_test_subscription_id" { description = "Unique ID of the Subscription_Test Subscription" } variable "location" { description = "Default location to deploy resources" default = "uksouth" }
Environment Variables
Now we will populate the local system’s Environment Variables for ingestion into the Variables we declared above.
Because we are passing in custom variables to Terraform, we need to make sure to prefix each variable we create with
TF_VAR_ to make sure Terraform matches it to whatever variable name comes after TF_VAR_ (this will make more sense
below).
NOTE: Terraform refers to the ID numbers slightly differently - the below table shows which term refers to which value:
| Azure | Terraform |
|---|---|
| App ID (from App Reg Overview Page) |
client_id |
| Client Secret Value | client_secret |
-
Copy the below code to your IDE of choice (I use VS Code) and replace the variable values with the ones noted previously (with the exception of
tenant_idonsubscription_idwhich you can find on the App Registration Overview and respective Subscription Overview pages), then run the commands.Set-Item -Path env:TF_VAR_tenant_id -Value "PASTE_TENANT_ID_VALUE_HERE" Set-Item -Path env:TF_VAR_payg_subscription_id -Value "PASTE_SUBSCRIPTION_ID_VALUE_HERE" Set-Item -Path env:TF_VAR_payg_client_id -Value "PASTE_CLIENT_ID_VALUE_HERE" Set-Item -Path env:TF_VAR_payg_client_secret -Value "PASTE_CLIENT_SECRET_VALUE_HERE" Set-Item -Path env:TF_VAR_subscription_test_subscription_id -Value "PASTE_SUBSCRIPTION_ID_VALUE_HERE" Set-Item -Path env:TF_VAR_subscription_test_client_id -Value "PASTE_CLIENT_ID_VALUE_HERE" Set-Item -Path env:TF_VAR_subscription_test_client_secret -Value "PASTE_CLIENT_SECRET_VALUE_HERE"
Terraform Versions File
Here we define our Provider Aliases and their related credentials, based around the Variables we declared - and subsequently populated via Environment Variables - above.
-
Create a file called
versions.tfand add the following code:terraform { required_providers { # https://registry.terraform.io/providers/hashicorp/azurerm/latest/docs azurerm = { source = "hashicorp/azurerm" version = "3.18.0" } } } provider "azurerm" { features {} alias = "pay-as-you-go" tenant_id = var.tenant_id subscription_id = var.payg_subscription_id client_id = var.payg_client_id client_secret = var.payg_client_secret } provider "azurerm" { features {} alias = "subscription-test" tenant_id = var.tenant_id subscription_id = var.subscription_test_subscription_id client_id = var.subscription_test_client_id client_secret = var.subscription_test_client_secret }
Here you see we are referencing the same tenant_id variable in both blocks.
But beyond that, we reference completely different subscription_id, client_id and client_secret variables.
Using the Provider Aliases
Finally, we need to deploy some test resources to the 2 Subscriptions - to do this with zero cost, we’ll just create a Resource Group in each Subscription, as shown below.
-
Create a file called
resource_groups.tfand add the following code:# Simple Resource Group in both subscriptions resource "azurerm_resource_group" "payg-rg-1" { provider = azurerm.pay-as-you-go name = "provider-aliases-payg-rg" location = var.location } resource "azurerm_resource_group" "subscription_test-rg-1" { provider = azurerm.subscription-test name = "provider-aliases-subscription_test-rg" location = var.location }
Run Terraform
At this stage, we should be in a good position to test the deployment of these Resource Groups to the 2 Subscriptions we’re targeting in the Provider Aliases.
- In a terminal, navigate to the folder in which you have saved the Terraform files above.
- Run
terraform fmt --recursive- because this always catches us out… - Run
terraform init - Run
terraform plan -out tfplan - Run
terraform apply --auto-approve "tfplan"
If any errors occurred when running the above, something wasn’t configured right. You’ll need to do some debugging!
The most common error I have made is supplying the Client Secret ID instead of the App Reg ID as the client_id.
Otherwise, go check to see the deployed Resource Groups in your Azure Subscriptions.
Hopefully this has demonstrated how Provider Aliases can be useful when deploying similar resources across multiple Subscriptions (or indeed Tenants).
I’m sure this principal could be applied similarly to AWS or GCP given sufficient modifications to the variables and resource names involved.
